Request and configure a custom domain for your ClearCRM workspace; includes DNS setup, testing, and approval process.
A custom domain replaces or augments the default ClearCRM address (app.clearcrm.com) with your branded URL, for example:
crm.yourbusiness.com (recommended: subdomain)
yourbusiness.com (root/apex domain)
A branded login page for your team and customers.
Professional, easy-to-remember link to your workspace.
Clear separation between accounts.
Important: Custom domains are available by request. You submit the domain inside ClearCRM, admins review the request, and once DNS and approvals are completed, ClearCRM maps the domain and provisions HTTPS.
Use this article if you want your ClearCRM workspace accessible via your own domain or subdomain, or if a customer asks “how do I make crm.mycompany.com point to ClearCRM?”
You submit a custom domain request inside ClearCRM.
You (or your IT admin) add DNS records at your domain registrar.
ClearCRM administrators review the request and approve or reject it.
Once DNS is correct and approved, ClearCRM maps the domain and provisions SSL.
You and your customers can log in via your custom URL.
If someone logs in through app.clearcrm.com, they’ll be automatically redirected to your custom domain after login.
Go to Main menu > My Account > Overview.
On the right side, locate your account details table.
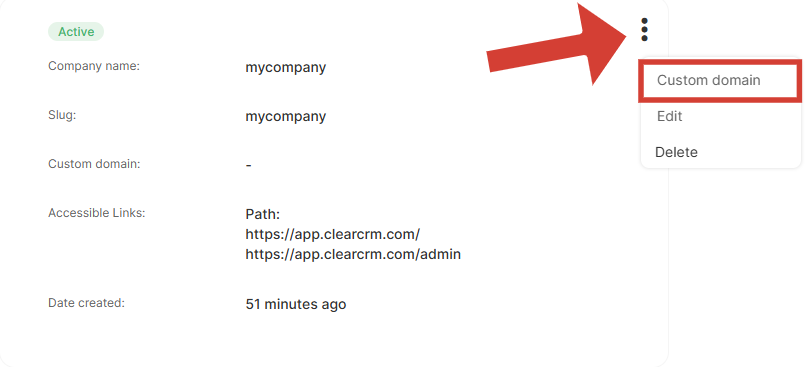
Click the three dots (More Actions) button at the top-right of the account details table.
Select Custom Domain from the dropdown menu.
The Custom Domain interface will appear (it replaces the account details table).
In the input field, enter the custom domain you’d like to use — e.g., crm.yourbusiness.com or yourbusiness.com.
Click Submit.
After submission:
ClearCRM administrators receive your request by email.
They will approve or reject the request and provide a reason if it’s not approved.
💡 Tip: Submitting your request first lets admins review availability before you spend time configuring DNS.
⚠️ If you plan to use your root (apex) domain (e.g., yourbusiness.com), note that modifying DNS at the root level may affect your email or other web services. When possible, use a subdomain (e.g., crm.yourbusiness.com) instead.
yourbusiness.comAdd the following A Records in your domain registrar’s DNS panel:
Type: A Host: @ Value: 3.147.248.31 TTL: Automatic(Optional for www):
Type: A Host: www Value: 3.147.248.31 TTL: AutomaticWhat this does:
Makes both yourbusiness.com and (optionally) www.yourbusiness.com point to ClearCRM’s production server IP.
In the DNS settings section of your registrar’s website, find the option to create a subdomain.
Enter “crm” (or your desired prefix) as the subdomain.
Once the subdomain is created, locate the DNS settings for that subdomain.
Add a new CNAME Record for the subdomain:
Host: crm (or your chosen prefix)
Value: The CNAME value provided in your ClearCRM Custom Domain Setup guide.
💡 You can find this value in My Account → Overview → Custom Domain → Custom Domain DNS Settings Guide.
(Optional) Add another CNAME Record for the “www” version:
Host: www.crm (or your chosen prefix)
Value: same CNAME value from your ClearCRM Custom Domain Setup guide.
Save changes in your registrar’s DNS panel.
Wait up to 48 hours for DNS propagation.
After propagation, open your subdomain URL (e.g., crm.yourbusiness.com) in a browser to confirm it loads correctly.
Root (apex) domains cannot use CNAME records due to DNS limitations, so they use A records that point directly to an IP address.
Subdomains can use CNAMEs, which are safer because ClearCRM can update infrastructure without requiring you to change DNS later.
Decide whether to use a subdomain or root domain.
Submit your custom domain request inside ClearCRM.
Configure the DNS records at your registrar using the guide above.
Wait for DNS propagation (can take up to 48 hours).
Wait for ClearCRM admin approval and SSL provisioning.
Review your request for availability and reserved names.
Verify your DNS records are configured correctly.
Map your domain to your workspace.
Generate and install an SSL certificate for HTTPS.
Notify you once the domain is live, or explain any rejection reason.
Browser Test:
After DNS propagation, open your domain (e.g., https://crm.yourbusiness.com).
If you see your ClearCRM workspace, DNS is set up correctly.
Advanced Check:
Use your terminal or command prompt:
nslookup crm.yourbusiness.comExpected output:
For subdomains: app.clearcrm.com
For root domains: IP address 3.147.248.31
Online Tools:
You can also use free “DNS Propagation Checker” tools to confirm global status.
Using Cloudflare: Disable the proxy (“orange cloud”) and switch to DNS only (gray cloud).
Duplicate records: Remove any old A/CNAME records that use the same host name.
Incorrect host field:
For root domains → use @
For subdomains → use only the prefix (e.g., crm, not crm.yourbusiness.com)
Reserved or blocked names: Some domains are reserved; the ClearCRM admin will notify you.
SSL delay: Certificate issuance can take a few hours after DNS propagation.
DNS propagation: up to 48 hours (usually much faster).
Admin review and SSL setup: 1–3 business days depending on request queue.
Verify that you’ve submitted a request from My Account > Overview > Custom Domain.
Check that DNS records exactly match the guide above.
Ensure there are no conflicting DNS records.
Disable Cloudflare proxy (if applicable).
Wait up to 48 hours for propagation.
If still not working, contact ClearCRM support with:
Domain name
Date/time DNS was configured
Screenshot of DNS records
Hi, I submitted a custom domain request for crm.example.com on [DATE].
DNS records were added as follows:
CNAME host crm → app.clearcrm.com
(optional) www.crm → app.clearcrm.com
Please verify and complete mapping/SSL setup.
For a root domain:
A record @ → 3.147.248.31
(optional) www → 3.147.248.31
Q: Can I change my custom domain later?
A: Yes, but you’ll need to submit a new request since it requires DNS and SSL changes.
Q: Is a custom domain mandatory?
A: No — it’s optional. You can continue using app.clearcrm.com if preferred.
Q: Will modifying DNS affect my company email?
A: It might, if you modify root A records. To avoid issues, use a subdomain like crm.yourbusiness.com.
Q: Can I share my custom domain with customers?
A: Yes! You can share it directly with your customers so they can log in through your branded URL.
Always prefer a subdomain setup (simpler, safer).
If using Cloudflare, set records to DNS-only during setup.
Keep a screenshot of DNS entries for quick support reference.
Go to My Account > Overview > More Actions > Custom Domain.
Submit your desired domain.
Add A or CNAME records at your registrar:
Root → A record → 3.147.248.31
Subdomain → CNAME → app.clearcrm.com
Wait for DNS propagation and admin approval.
Test and share your branded domain with your team and customers.
✅ You’re all set!
Once approved and DNS is live, your workspace and login page will be available at your own custom domain — bringing a polished, professional look to your ClearCRM experience.
